Sending Email with Node-RED
This tutorial shows you how to set up automated email notifications from your OV80i camera using Node-RED. You'll learn to configure Gmail integration and create flows that send inspection alerts, system status updates, and failure notifications directly to your email.
What You'll Build: An automated email system that sends OV80i inspection results, alerts, and notifications to specified recipients using Gmail SMTP.
Real-World Application: Get instant email alerts when inspections fail, send daily quality reports to management, or notify maintenance teams of system issues - all automatically from your vision inspection system.
Prerequisites
- OV80i camera with Node-RED access
- Gmail account for sending emails
- Basic understanding of Node-RED flows
- Access to Google Account security settings
Tutorial Overview
What we'll build: A Node-RED flow that automatically sends email notifications with inspection results and system alerts.
Time required: 20-30 minutes (including Gmail setup)
Skills learned: Gmail app password setup, SMTP configuration, automated email notifications
Step 1: Set Up Gmail App Password
1.1 Enable 2-Step Verification
- Sign in to your Google Account at accounts.google.com
- Click "Security" in the left navigation menu
- Find "Signing in to Google" section
- Click "2-Step Verification"
- Follow the prompts to enable 2-Step Verification if not already enabled
2-Step Verification is required before you can create app passwords.
1.2 Generate App Password
- Return to Security page after enabling 2-Step Verification
- Click "App passwords" (under "Signing in to Google")
- Select "Mail" as the app type
- Select "Other" as the device type
- Enter a name like "OV80i Node-RED Email"
- Click "Generate"
1.3 Save Your App Password
- Copy the 16-character password that Google displays
- Store it securely - you'll need it for Node-RED configuration
- Note: This password is only shown once. If lost, generate a new one
Checkpoint: You should have a 16-character Gmail app password saved for Node-RED use.
Step 2: Install Email Nodes (If Needed)
2.1 Check for Email Nodes
- Open Node-RED on your OV80i camera
- Look in the left palette for an "email" node in the output section
- If missing, you'll need to install the email package
2.2 Install Email Package (If Required)
- Click the hamburger menu (≡) in Node-RED
- Select "Manage palette"
- Click "Install" tab
- Search for "node-red-node-email"
- Click "Install" next to the package
Step 3: Create Basic Email Flow
3.1 Add Required Nodes
- Navigate to IO Block > Configure I/O to access Node-RED
- Drag these nodes from the palette to your canvas:
- Inject node (for testing)
- Email node (from output section)
- Connect inject output to email input
3.2 Basic Flow Structure
Inject → Email
Flow purpose: Simple email sending for testing and basic notifications.

Step 4: Configure Email Content
4.1 Set Up Inject Node
- Double-click the inject node to open properties
- Set the payload:
- Payload type: "string"
- Payload value: Your email body text (e.g., "Inspection alert from OV80i")
- Add email subject:
-
Click "+ add" to add a property
-
Property name: "topic"
-
Property value: Your email subject (e.g., "OV80i Inspection Alert")
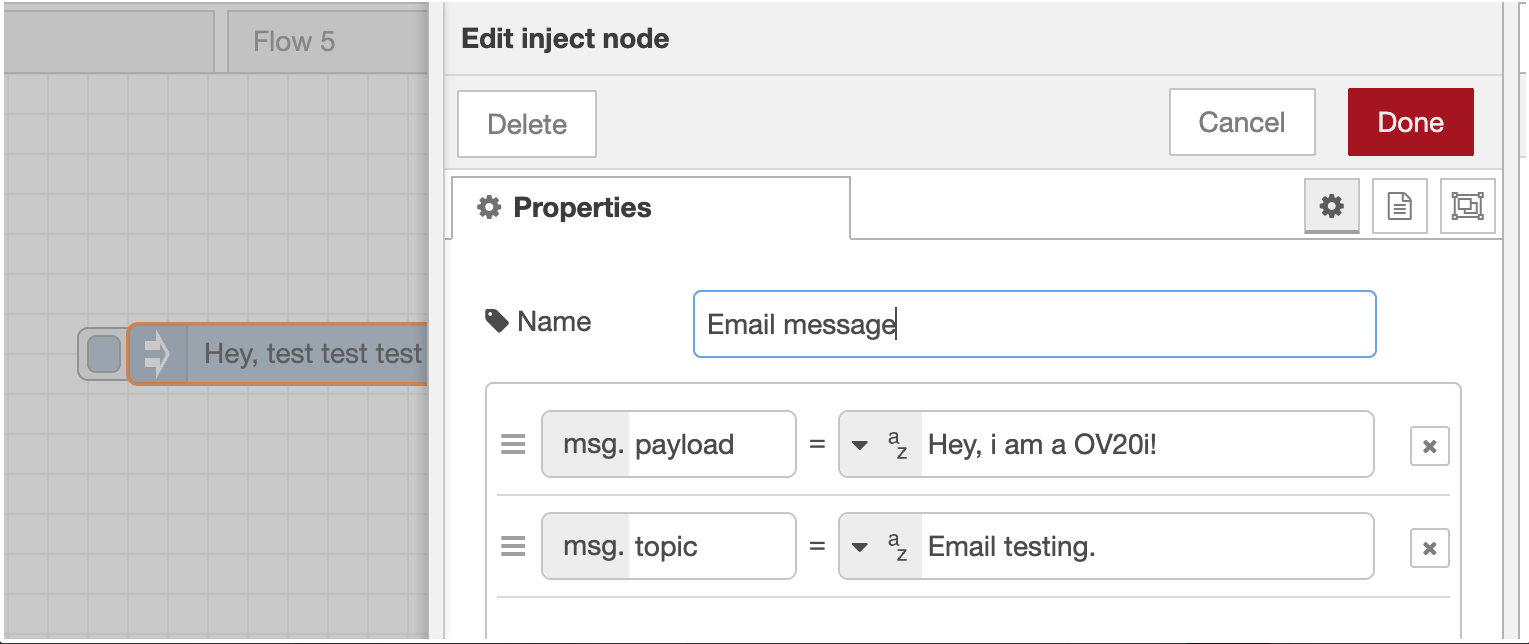
-
4.2 Example Basic Configuration
Payload (email body):
Inspection completed at Station 1
Status: Alert triggered
Time: Check timestamp for details
Topic (email subject):
OV80i Inspection Alert - Station 1
4.3 Save Inject Configuration
- Give the node a name like "Email Trigger"
- Click "Done" to save the configuration
Step 5: Configure Email SMTP Settings
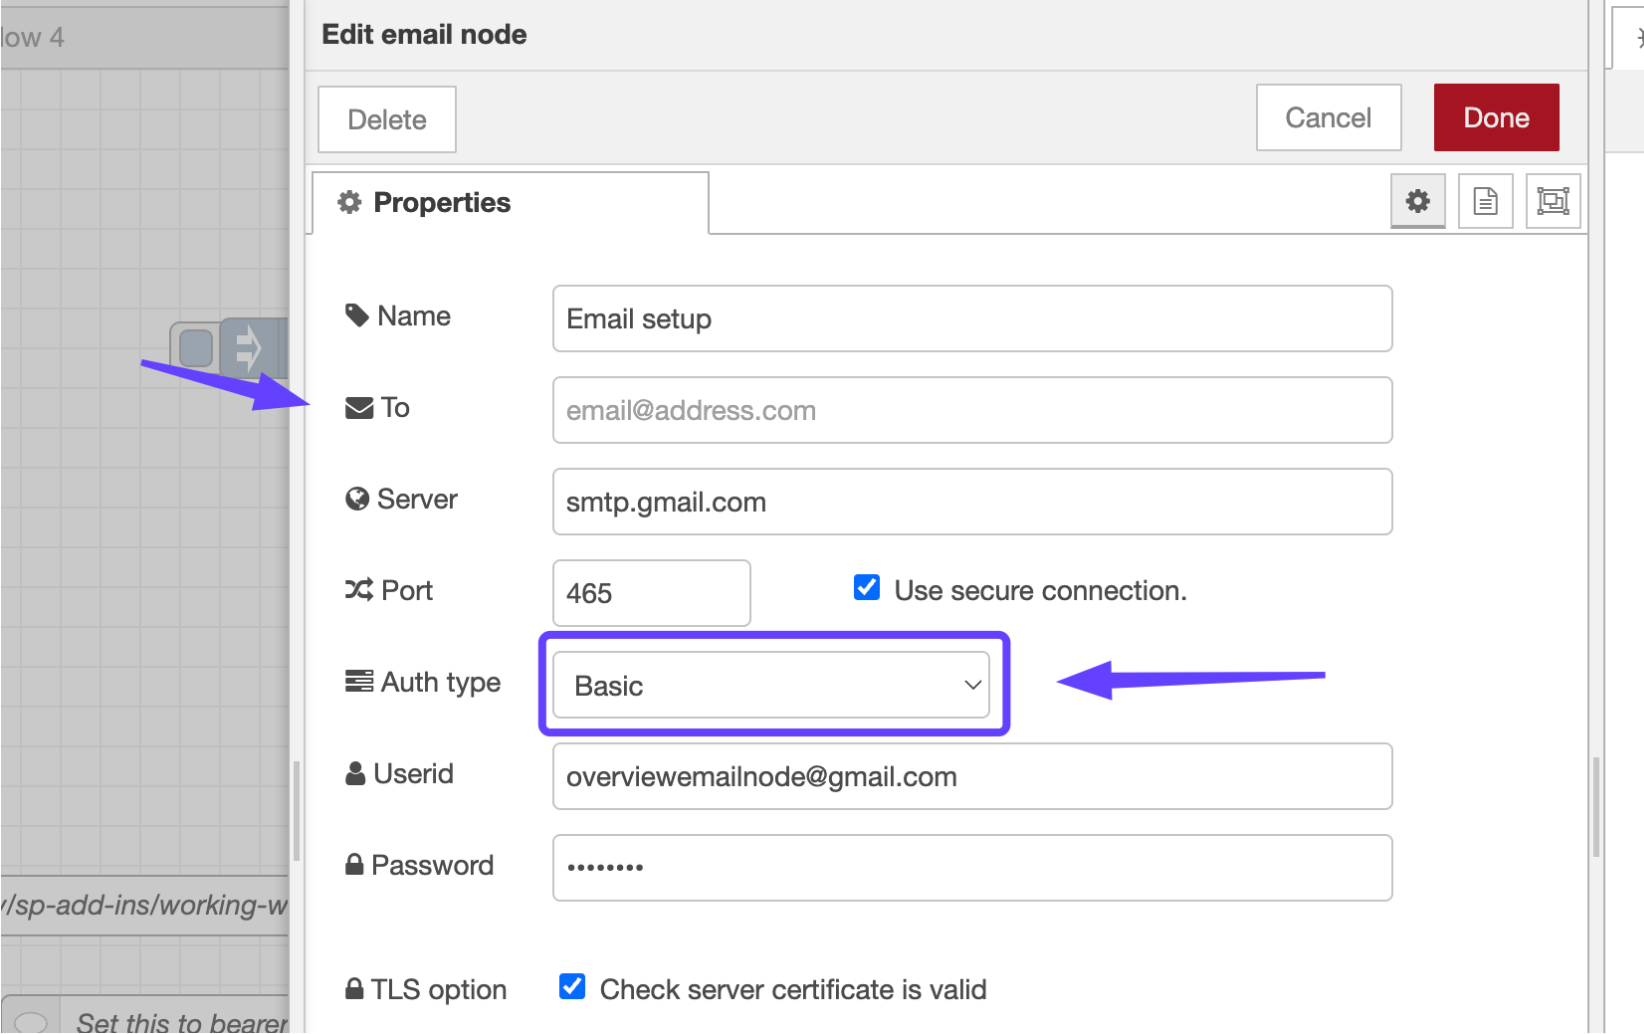
5.1 Set Up Email Node
- Double-click the email node to open properties
- Configure basic settings:
- Name: "Send Alert Email" (or descriptive name)
- To: Recipient email address (e.g., quality@company.com)
5.2 Configure Gmail SMTP
- Server:
smtp.gmail.com - Port:
465 - Check "Use secure connection"
- Auth type:
Basic - Userid: Your full Gmail address (e.g., alerts@company.com)
- Password: The 16-character app password from Step 1
5.3 Security Settings
- Check "Check server certificate is valid"
- Verify all settings are entered correctly
- Click "Done" to save email node configuration
Checkpoint: Your email node should show no error indicators and display the recipient address.
Step 6: Test Your Email Flow
6.1 Deploy and Test
- Click "Deploy" button in the top-right corner
- Wait for "Successfully deployed" message
- Click the inject node button (gray square on the left side)
6.2 Verify Email Delivery
- Check the recipient email for the test message
- Check spam folder if email doesn't appear in inbox
- Look for any error messages in Node-RED debug panel
6.3 Troubleshoot If Needed
Common issues:
- Wrong app password: Regenerate Gmail app password
- SMTP settings: Verify server and port are correct
- Firewall: Ensure outbound SMTP traffic is allowed
Step 7: Integration with Inspection Results
7.1 Connect to Inspection Flow
To send emails based on inspection results:
- Find your main inspection flow (starts with "All Block Outputs")
- Add your email flow as a branch from inspection processing
- Connect after inspection logic but parallel to final results
7.2 Example Integration Flow
All Block Outputs → [Inspection Logic] → Final Pass/Fail
                                      ↓
                              Format Email → Send Email

7.3 Dynamic Email Content
Replace the inject node with a function node for dynamic content:
// Dynamic email based on inspection results
const result = msg.payload.result ? "PASSED" : "FAILED";
const timestamp = new Date().toLocaleString();
const station = global.get("station_name") || "Unknown Station";

// Set email subject
msg.topic = `Inspection ${result} - ${station}`;

// Set email body
msg.payload = `Inspection Report:
Status: ${result}
Station: ${station}
Time: ${timestamp}
Image: ${msg.payload.image_url || "No image available"}

Please review and take appropriate action.`;

return msg;
Step 8: Complete Flow Example
8.1 Import Ready-Made Flow
You can import this complete flow JSON:
[
  {
    "id": "email_node_1",
    "type": "e-mail",
    "name": "Send Inspection Alert",
    "server": "smtp.gmail.com",
    "port": "465",
    "secure": true,
    "authtype": "BASIC",
    "to": "quality@company.com"
  },
  {
    "id": "format_email",
    "type": "function",
    "name": "Format Email Content",
    "func": "const result = msg.payload.result ? 'PASSED' : 'FAILED';\nmsg.topic = `Inspection ${result}`;\nmsg.payload = `Status: ${result}\\nTime: ${new Date()}`;\nreturn msg;"
  }
]
8.2 Customize for Your Needs
- Update email addresses for your organization
- Modify email content for your specific requirements
- Adjust timing and trigger conditions
- Test thoroughly before production deployment
Troubleshooting
Common Issues
| Problem | Symptoms | Solution |
|---|---|---|
| Authentication failed | "Login failed" errors | Verify app password is correct and 2-step verification is enabled |
| Connection timeout | No email sent, timeout errors | Check firewall settings, verify SMTP server and port |
| Emails in spam | Emails delivered but in spam folder | Add sender to safe list, improve email content |
| Flow not triggering | No debug output | Check flow connections and trigger conditions |
Debug Your Email Flow
- Add debug nodes after each step to trace data
- Check Node-RED logs for detailed error messages
- Test SMTP settings with external email clients if needed
- Verify network connectivity from camera to Gmail servers
Success! Your Email Integration is Complete
Your OV80i camera can now:
✅ Send automated email notifications for inspection results
✅ Deliver rich, formatted messages with inspection details
✅ Support multiple recipients and escalation workflows
✅ Provide scheduled reports and summaries
✅ Handle conditional messaging based on inspection outcomes
Best Practices
Email Management
- Use descriptive subjects with clear status indicators
- Keep messages concise but informative
- Include timestamps and station identifiers
- Provide actionable information in notifications
Security and Reliability
- Protect app passwords - store securely and rotate regularly
- Use dedicated email accounts for system notifications
- Test email delivery regularly to ensure reliability
- Monitor for delivery failures and have backup notification methods
Performance Considerations
- Limit email frequency to avoid spam detection
- Use appropriate recipient lists for different alert types
- Implement rate limiting for high-volume systems
- Consider email size when including large attachments
Next Steps
After setting up email notifications:
- Create email templates for different types of alerts
- Set up distribution lists for various stakeholders
- Implement escalation workflows for critical issues
- Create scheduled reports for management
- Integrate with other notification systems (SMS, Teams, etc.)